
Craig Dewdney introduces a minimally invasive multidisciplinary discoloured dentition case.
Today thankfully, the dentist mindset is much more focused on implementing minimally invasive techniques to elective cosmetic dentistry. With a patient demographic that is now far more self-researched, this is often even requested by patients at the first point of contact from them.
When dealing with a discoloured dentition from tetracycline staining, we have a number of treatment modalities we can offer to that patient who requests an improvement to their smile in terms of tooth value:
- Long-term tooth whitening
- Camouflage through composite veneers, often in conjunction with short-term whitening
- Camouflage through ceramic veneers, in conjunction with short-term whitening.
Beyond this, focusing on which is most suitable relates to patients’ time constraints, if deadlines exist, and material choice with their associated advantages and disadvantages.
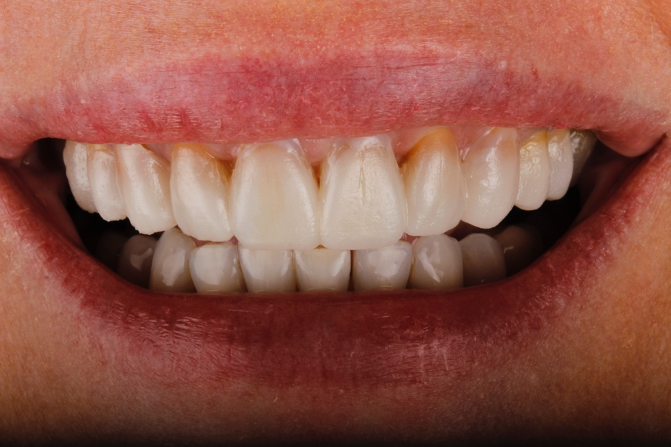
In the case shown, (Figure 1a) the patient wanted her teeth to be completed prior to her wedding in 14 weeks from the time she presented. She also requested a material with the longest performing clinical lifespan.
 Figure 1a: Pre-operative presentation


Ceramic case considerations
There are several techniques we can employ to camouflage dark tooth substrates with ceramic veneer workflows:
- Increase the ceramic thickness of the prostheses
- Apply internal/external stains to reduce prosthesis translucency and its inherent ability to be influenced by the substrate value
- Adopt a more aggressive or subtractive approach to tooth preparation design, allowing use of opaque copings.
If all of these considerations are taken into account with this case, we can see that the upper right central incisor would be subject to significant tooth reduction (Figures 1b and 1c) and the risk of iatrogenic pulpal death would be increased. Even with immediate dentine sealing and other protective practices adopted.
So, prior to a hygiene work up, the patient was then assessed from an orthodontic perspective for short-term pre-restorative orthodontics. This was to improve tooth position (Figures 2 a,b and c) and allow for a less destructive tooth preparation.
 Figure 2a: Pre-operative tooth position; 3 Shape intra-oral scan; occlusal views


Avant Garde workflows
My workflows, which are followed from the Avant Garde training programme, always have the end point visualised and confirmed prior to commencement of treatment. Our treatment assessment, design, manufacture and implementation is also driven from an entirely digital foundation. The benefits of which I will touch on later.
In order to motivate the patient, a digitally-designed motivational mock up is delivered to the mouth for the patient to see. In pre-restorative orthodontic cases, the mock up is made more additively. So the design helps to share with the patient the vision, without confusion of teeth protruding through. With clinical photographs and videos recorded and shared of the patient in portrait at this stage, the added volume from the mock up doesn’t become influential.
This stage works powerfully to not only add a dimension to informed consent that we previously couldn’t offer, but also is a very emotive stage for that patient, and highly motivates them to comply to the treatment.
Managing accuracy
The treatment time in fixed orthodontics was 2.5 months. This focused mainly on the maxillary anterior teeth. Dual arch fixed orthodontic appliances were placed. Mainly to allow for use of additional elastics to expedite finishing. Elastics were also used within the upper arch to redistribute space to further minimise invasiveness by reducing the reliance upon IPR (Figure 3).

Post orthodontically, the patient had fixed and removable retainers provided. The patient is educated from the very start that this will be a lifelong commitment for them (Figures 4a and b).
 Figure 4a: Post orthodontic tooth position; occlusal view

Accuracy of preparation control is managed through several arms of the workflow:
- Diagnostic digital wax up; transferred to the mouth prior to tooth preparation to allow depth reduction burs to drive the amount of tooth prepared (Figure 5)
- Availability to use a 3D-printed removable transfer that shows the position of the final labial and incisal dimensions of the ceramic design. This can allow for direct measurements to be taken during the procedure with instruments like a Williams probe, confirming restorative space created
- A further fully digital clinical check communicated via the laboratory during the tooth preparation appointment. The laboratory have the diagnostic digital design, which can be accurately superimposed on top of a digital scan I can quickly create of the prepared teeth. I arrange ahead of the appointment some scheduled time for the laboratory to review this. They can give me sites where further reduction or modification is needed, to an accuracy of 0.1mm
- Use of an operating microscope provides an unparalleled view of the teeth being prepared. Whilst not every clinician will have the accessibility of an operating microscope, certainly the advantages to using dental loupes in this process would be encouraged to gain accuracy in tooth preparation.
This provides me, the treating clinician, with total confidence that my restoration margins can be clearly interpreted. The preparation design I’ve created allows delivery of the fixed prostheses planned. And the restorative space is sufficient for masking a dark tooth substrate, relevant to this case.
Final results
Sites of exposed dentine during preparation are protected with immediate dentine sealing procedures. The patient is welcomed to review the temporary bisacryl veneers for a minimum of one week. This allows us to confirm ideal phonetics, occlusal balance, and the final design aesthetic.
At this point the patient is asked to sign off satisfaction of the aesthetic smile design. Again, because this is milled digitally, this perfectly replicates the tooth form and texture that the temporaries provide.
At the fitting appointment and after local anaesthetic is given, temporaries are removed. The final ceramics are placed with a wet try in for patient confirmation.
Cementation is carried out under rubber dam. I find this is the only reliable way to manage a clear operator field, free of blood and salivary contamination after air abrasion of the tooth abutments has been carried out.
Once the ceramics were fitted in this case, the maxillary upper and lower fixed retainers, which were removed at the stage of preparation, were re-fitted for definitive fixed retention. Thereafter jointly retained with definitive removable Essix retainers (Figures 6 a, b, c and d).
 Figure 6a: Post treatment results; insertion of 20 ceramic units over the upper and lower arch


Conclusion
Whilst there are other ceramic workflows carried out in dentistry today, with clinically satisfactory results, I feel this method provides a truly interactive process for the patient. They feel actively engaged with the planning process, responsible for the treatment and commitments required of them, and are fully aware of their decision choices.
From a clinician’s perspective, it allows production of long-lasting aesthetic ceramic treatments that have been ethically planned, accurately prepared, and conscientiously delivered. All from an evidence base of minimally invasive, truly adhesive and biologically respectful protocols.

