Follow Dentistry.co.uk on Instagram to keep up with all the latest dental news and trends.
 In the first of a regular series, Josh Sharpling and Zo Ali give readers their prosthodontips. In the first column they discuss digital dentistry, or more specifically, CAD/CAM.
Digital technology is now commonplace in dentistry including:
- Practice management software
- Patient tracking
- Radiographs
- Cameras.
However, when most talk about ‘digital dentistry’, they mean the use of CAD/CAM. This is what we are going to talk about in the column this month.
An overview of CAD/CAM for complex fixed prosthodontic cases
I will define complex cases as; cases which involve treating an entire arch, a full mouth, increasing the OVD, or cases with a high aesthetic demand.
Future columns will delve in depth to more specific digital versus conventional issues. For example conventional versus digital impressions. So we will not cover it in depth this month.
I’ve split digital dentistry into three for this discussion;
- Computer aided design – CAD
- Impressions
- Computer aided manufacturing – CAM.
Computer aided design (CAD)
When planning a complex case, a 3D design of the desired outcome is essential.
Traditionally this entailed completion of a diagnostic wax up by a dental technician, at a site distant to the treating clinician. Occasionally with the help of some photographs.
Alterations were possible, but require sending the wax up back to the technician. This was a time consuming and costly process often resulting in delays to treatment.
Many people are comfortable with digital smile designing. This often involves overlaying smile designs on a picture of the patient.
There are many powerful pieces of software that can aid this process. We consequently sometimes call these treatment outcome simulators, which are common in orthodontics.
CAD is a fantastic tool for complex cases. It can save time, money and remakes due to the ability to share and alter the digital designs – before making any physical models.
Digital creation of 3D designs (CAD) also allows more rapid alterations. Along with easier communication between technician and clinician.
Creating digital designs
We carry out digital designs (a digital wax up) on a computer, and mimic the conventional technique. However, we don’t create anything physical until we achieve the desired outcome virtually, using software. Examples of this include:
- Dentalcad by Exocad
- Inlab by Dentsply Sirona
- Dental System by 3shape.
Digital designs also allow the technician to complete multiple designs quickly. Allowing comparisons and exploration of various options.
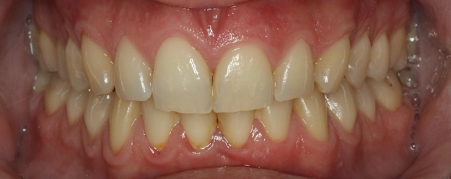
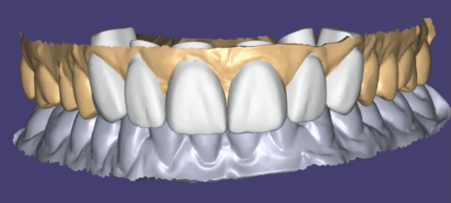
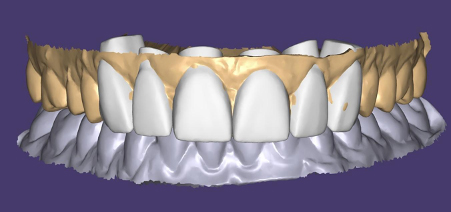
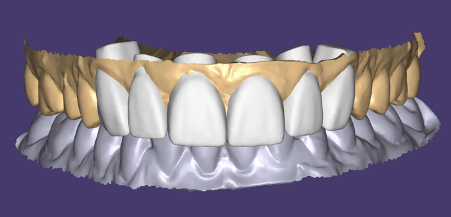
Below shows an aesthetically driven case where the lab shared the 3D design with me. I could manipulate this in 3D to assess where we need alterations.
Three iterations of the design were created in an afternoon before a digital model was printed. This means creating only one physical model (rather than three). This also creates a significant cost and time saving.
These steps in CAD also help with patient consent.
In the case below, the 3D designs were shared with the patient allowing them to give input and affect the final outcome. Including the patient in this design process increases their sense of ownership over their oral health and also the perceived value of the treatment.
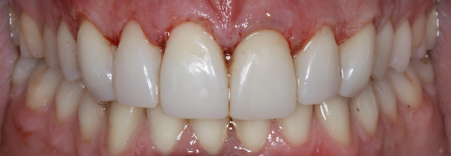
Only once the patient and clinician are satisfied did we commence with the creation of a physical model.
This model was then used to guide an intra-oral mock up, in order to gain aesthetic consent before commencing treatment. This methodology is the same whether the outcome is composite build ups, ceramic veneers, crowns, implants etc.
Impressions
Digitising impressions can occur in two different ways. Directly via an intra-oral scanner or indirectly via a lab scanner.
An intra-oral scanner takes many small pictures of a tooth/teeth, and then uses an algorithm to stitch these into a full 3D model. A lab scanner takes photos of the entire arch in one go, at different angles, and then stitches these together.
An intra-oral scanner is as accurate as a lab scanner and a conventional impression for a single unit, and up to a quadrant. However, the accuracy decreases as the size of the area scanned increases.
The accuracy is lowest in the tooth furthest from where the scan starts, and in the apico-coronal axis.
Currently studies argue intraoral scanners are not as accurate as conventional impression methods for full arch scans (Ahlholm et al, 2018; Schmidt et al, 2020; Mangano et al, 2017; Malik et al, 2018; Nagy et al, 2020; Ender et al, 2016). The reasons for this will be discussed in future issues of Prosthodontips.
What does this mean clinically?
An intraoral scan will represent each individual tooth well, but maybe not the position of teeth in relation to each other.
Therefore; creating restorations from an intraoral scan might result in well-fitting individual restorations. But these may not be at the correct occlusion.
Computer aided manufacture (CAM)
The main benefit of computer aided manufacture for larger cases is the ease of transferring critical data from the provisional to the definitive restorations.
Once a set of satisfactory provisional restorations are in place, you can use these as a template for the fabrication of the final restorations.
A master 3D digital design is created either through an intraoral scan (single units or quadrants) or by taking a conventional impression. This is subsequently digitised using a lab scanner (full arch or full mouth cases).
The technician can now use the master 3D design and the master impression of the preparations for the final restorations.
Crowns fabricated in a digital method (as opposed to the conventional lost wax method) have been shown to have a fit which is as good – or better than – conventional methods.
This is true across a variety of materials (Hamad et al, 2019; Hamad et al, 2019; Tabesh, et al; 2020, Berrendero, et al; 2019, Haddadi, et al; 2019).
Suggested workflow for complex cases
- Intraoral scan or conventional impression
- Fabrication of a 3D design. Diagnostic wax up
- 3D design used to guide tooth preparations and provisional restorations, which are then adjusted intraorally
- Conventional impression of the aesthetically and occlusally correct provisional restorations
- Digitisation of the conventional impression by a lab scanner (master 3D design)
- Master 3D design used to fabricate final restorations
- If fabricating full arch restorations – conventional impressions of the preparations are required (other techniques do offer opportunity to use intraoral scanning but we will cover them in a later column)
- If converting from provisional restorations to final restorations sextant by sextant then intraoral scanning is acceptable.
Tips and tricks for digital impressions
- Lots of retraction
- Intraoral scanners are optical scanners – they can scan what they see
- Conventional impressions use some hydrostatic pressure to drive material into sulcus, so require less retraction
- Use the scan to identify errors before the patient leaves – margin check, reduction check, undercuts
- Work in quadrants or sextants.
Question and answer section
If you have any questions, please send an e-mail to [email protected] and we will then answer the question in next month’s column.
Lab work credit; Byrnes Dental Lab.

